Response Manager is a tool inside the PF Choice Eliminator add-on for Google Forms. PF Choice Eliminator lets you cap how many times each answer choice in a form can be selected — for example, limiting a “Choose your slot” question so each slot can only be picked once. Response Manager gives you a live, editable view of everyone who has submitted the form, so you can see who selected what, correct a mistaken submission, or remove a submission to free up a slot for someone else.
Use Response Manager when you need to:
- See which Respondent selected which limited choice, and when they submitted.
- Change the choice a respondent selected after they’ve already submitted.
- Delete a submission to free up capacity for a choice that’s full.
- Export all responses and their selected choices to a CSV file.
Before you begin #
- Response Manager is part of the PF Choice Eliminator add-on, so the add-on must already be added to your Google Form.
- Response Manager only manages the choices that PF Choice Eliminator is tracking (the ones with a limit set under Question Limits). It shows the choices each Respondent selected for those limited questions, not every answer on the form.
- If your form’s Collect email addresses setting (under the form’s native Settings > Responses) is set to Do not collect, Response Manager shows Anonymous Respondent instead of an email address for each submission.
Open Response Manager #
There are two ways to open Response Manager from your form.
Option 1: From the Add-ons menu #
- Open your form in Google Forms.
- Click the Add-ons icon (the puzzle-piece icon at the top right of the toolbar).
- Select PF Choice Eliminator.
- Select Response Manager.
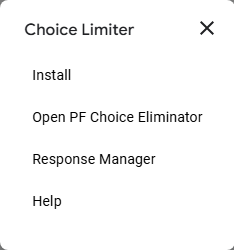
This opens the PF Choice Eliminator window directly on the Response Manager tab.
Option 2: From the PF Choice Eliminator panel #
If the PF Choice Eliminator panel is already open on your screen (it appears docked in the bottom-right corner of the form editor), click Responses (N) at the bottom of the panel, where N is the current number of responses. This opens the same Response Manager view.
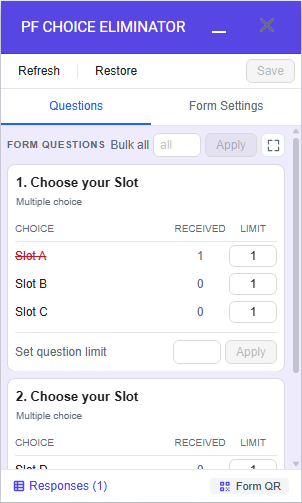
Tip: From inside the PF Choice Eliminator window, you can switch between its two tabs at any time: Question Limits (where you set how many responses each choice can receive) and Response Manager (where you manage individual submissions).
Understand the Response Manager table #
Response Manager lists every submission in a table with these columns:
- Respondent Email — the email address of the person who submitted the form, or Anonymous Respondent if the form doesn’t collect email addresses.
- Submitted Timestamp — the date and time the response was submitted.
- Selected Choices — the limited choices the Respondent selected, shown as individual tags (for example, Slot A, Slot E).
- Actions — buttons to Preview, Edit, or Delete that submission.
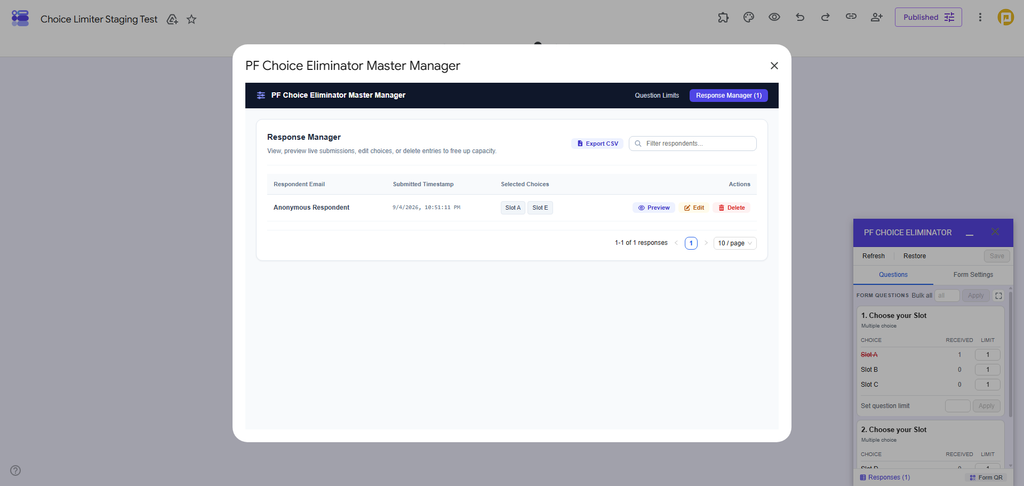
At the bottom of the table, a page control shows how many responses are being displayed (for example, “1-1 of 1 responses”) along with page navigation arrows and a rows-per-page selector.
Find a response #
Use the Filter respondents… search box at the top of the Response Manager table to search for a specific submission. As you type, the table updates to show only matching rows. If nothing matches your search, the table shows No matching responses found.
Preview a response #
Click Preview next to a response to view that Respondent’s submission.
Edit a respondent’s selected choices #
If a respondent needs a different choice than the one they originally selected — for example, if they should be moved to a different slot — you can change it directly from Response Manager instead of asking them to resubmit the form.
To edit a response:
- In the Response Manager table, find the response you want to change.
- Click Edit in the Actions column for that row.
- In the Edit Submission dialog, review the Respondent’s name or email under Respondent.
- Under Change Selected Choices, use the dropdown menu for each question to select a different choice. Each option in the dropdown shows how many responses that choice has received against its limit, and marks any choice that has reached its limit as FULL.
- Click Save & Reallocate Slots to apply your change, or Cancel to close the dialog without making changes.
Saving updates the Respondent’s selected choice and adjusts the received counts for both the old and new choices accordingly.
Note: The Edit Submission dialog also includes a link, Open Official Google Forms Edit Page, which opens the response in Google Forms’ own native response-editing page.
Delete a response #
Deleting a response removes that submission and frees up the slot(s) it was using, so another respondent can select that choice.
To delete a response:
- In the Response Manager table, find the response you want to remove.
- Click Delete in the Actions column for that row.
- A confirmation dialog appears: “Are you sure you want to delete the submission from [Respondent]? This will free up 1 slot for each selected choice.”
- Click Delete to confirm, or Cancel to keep the response.
Warning: Deleting a response cannot be undone from Response Manager. Make sure you’re removing the correct submission before confirming.
Export responses to a CSV file #
Click Export CSV at the top of the Response Manager table to download all current responses and their selected choices as a CSV file. Use this when you need to share response data outside of Google Forms or keep an offline record.
Change how many responses appear per page #
Use the rows-per-page selector at the bottom right of the table (it shows 10 / page by default) to choose how many responses are displayed at once. You can choose 10 / page, 25 / page, or 50 / page. Use the arrows next to the page number to move between pages.
Related: managing choice limits #
Response Manager works together with the Question Limits tab in the same PF Choice Eliminator window. Question Limits is where you set how many times each choice can be selected before it’s marked FULL; Response Manager is where you manage the individual submissions that count against those limits. To view or change a limit, open PF Choice Eliminator and click Question Limits at the top of the window.


